


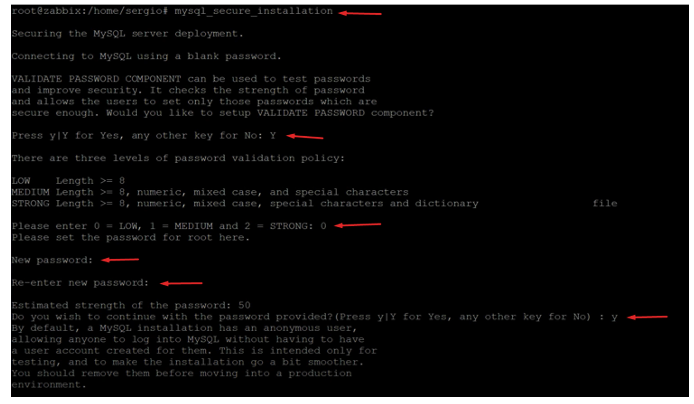
Here is another way to change the password:
# mysql
mysql> ALTER USER ‘root’@’localhost’ IDENTIFIED BY ‘S4nt14g0.2023’;
mysql> quit;

Log in to MySQL with the root user and the password we added in the previous step:
# mysql -u root -p
password

Create the database named ‘zabbix’ with the collate ‘utf8mb4_bin’:
mysql> create database zabbix character set utf8mb4 collate utf8mb4_bin;

Create the user and password that we will use to connect Zabbix with MySQL:
mysql> create user zabbix@localhost identified by ‘Zabbix.2023’;

Grant permissions to the newly created user on the newly created database:
mysql> grant all privileges on zabbix.* to zabbix@localhost;

mysql> quit;
# mysql
# set global log_bin_trust_function_creators = 1;
# quit;

# zcat /usr/share/zabbix-sql-scripts/mysql/server.sql.gz | mysql -u zabbix -p zabbix
Enter password: Zabbix.2023

# vi /etc/zabbix/zabbix_server.conf

Search for DBUser=Zabbix, uncomment #DBPassword, and set the password you are using.
The configuration should look like this:
—————————————————-
DBUser=zabbix
### Option: DBPassword
# Database password.
# Comment this line if no password is used.
#
# Mandatory: no
# Default:
DBPassword=Zabbix.2023
——————————————————

EDIT
# vi /etc/zabbix/apache.conf

Search for the following line:
# php_value date.timezone Europe/Riga
Uncomment the line and set the time zone:
# php_value date.timezone America/Santiago

The language configuration is only to ensure there are no issues with the interface output.
# locale-gen “en_US”

- zabbix-server
- zabbix-agent
- apache2
# systemctl restart zabbix-server zabbix-agent apache2
# systemctl enable zabbix-server zabbix-agent apache2

To do this, simply open your preferred web browser and enter the following URL:
http://host-IP/zabbix
Replace host-IP with the IP address of the Zabbix server you just installed:

A window will appear with the pre-check and the status of each one; they should all be OK.

The next window will ask for the database connection details. These are the details we configured earlier. Press the NEXT button to continue.

Validate the time zone and the name of the Zabbix server, then press NEXT.

A summary of the entire pre-installation will be displayed. Review it and press NEXT to continue, then FINISH to complete.


From there, you just need to log in again and proceed with the configuration of vCenter or the ESXi host.

1.- Go to Configuration > Hosts > Create host.
2.- Enter the Host name (e.g., vcenter).
3.- Enter Visible Name (e.g., VMware vSphere).
4.- Select Groups (any, e.g., Hypervisors).
5.- In Interfaces, enter the IP address of the vCenter with port 10050 (optional).
6.- Go to Macros.

7.- Create 3 Macros like these:
{$URL} with the value of your vCenter URL.
{$USERNAME} with the value of your vCenter username.
{$PASSWORD} with the value of your vCenter password.

8.- Enter a Password, URL, and Username of the vCenter in the Values fields. Go to Templates and
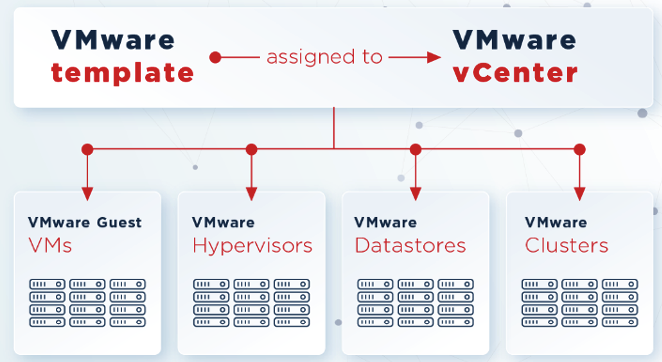
9.- link the template “Template VM VMware.”

10.- After All Configurations, click on Add.
11.- This will take some time from the vCenter the first time, as much as 1 or 2 hours or more.
12.- As soon as it fetches the data from vCenter, you will be able to see all the discovered items from vCenter, such as Datacenters, Clusters, ESXi Hosts, and Virtual Machines.
13.- To view all the information, go to Configurations > Host groups.
And that’s it! You have now added vCenter.
To add a standalone ESXi host, we need to perform several activities:
- Modify the Zabbix configuration file.
- Enable enablemob on the ESXi host.
- Obtain the UUID of the ESXi host.
- Create an account on the ESXi host to use in Zabbix.
Let’s get started:
- Edit the zabbix_server.conf configuration file and add:
# vi /etc/zabbix/zabbix_server.conf
And then in the line LogFile=/var/log/zabbix/zabbix_server.log
LOOK FOR THE FOLLOWING VALUES AND UNCOMMENT THEM:
StartVMwareCollectors
VMwareFrecuency
VMwarePerfFrecuency
VMwareCacheSize
VMwareTimeout

- Restart the Zabbix service:
# sudo systemctl restart zabbix-server
- Access the ESXi Host:
Navigate to Host -> Manage -> System -> Advanced Settings -> Filter by enablemob.
4.- Edit the value to True.

Find the UUID of the ESXi Host:
https://IP-Host-ESXi/mob/?moid=ha-host&doPath=hardware.systemInfo


curl –insecure -s -u your_esxi_username:your_esxi_password
https://your_esxi_host/mob/?moid=ha-host&doPath=config.uuid
5.- Create the Zabbix user on the ESXi host:


6. Grant permissions to the new user on the ESXi host:

- Click on “Add User”:

- Select that it will be a read-only user, which is the required permission:

- Click on “Add”:

10. The user is now added:

11. Now, let’s go to Zabbix:
Navigate to Configuration -> Hosts in the Zabbix web interface.

12. Click on “Create Host”:

13. In the “New Host” window, in the “Host” tab, add the following details:

Host Name
Template = VMware hypervisor ICM Ping
Groups = Template/Virtualization
Agent = add the Host’s IP or hostname
THEN go to the “Macros” tab:
Create the following macros:

{$VMWARE.PASSWORD} = Kapsch.2023
{$VMWARE.URL} = https://192.168.233.13/sdk
{$VMWARE.USERNAME}=zabbix
{$VMWARE_PERF_INTERVAL} = 5m
{$VMWARE.HV.UUID} = = Valor del UUID del Host
CLIC boton ADD
Finally go to Menu Monitoring Lastest data and filter by host added APPLY

We will now start seeing the collected data:


